Friday, January 24, 2025

Step-by-Step Guide to Building Custom Wooden Wall Signs

A Comprehensive Guide to Crafting Bespoke Wooden Wall Signs

The creation of custom wooden wall signs offers a rewarding blend of artistry and craftsmanship. This detailed guide will provide a comprehensive walkthrough, suitable for both novice and experienced woodworkers, encompassing every stage from initial design to final finishing. Through meticulous attention to detail and a systematic approach, you can produce a truly unique and enduring piece of home décor or personalized gift.

Phase 1: Design and Planning

Conceptualization and Sketching

The foundation of any successful project lies in its design. Begin by clearly defining the purpose of your sign. Is it for a business, a personal message, or a decorative element? Consider the intended location and the overall aesthetic of the surrounding space. Sketch several design options, experimenting with different fonts, layouts, and imagery. Explore various stylistic approaches, from rustic and minimalist to ornate and elaborate. A well-defined sketch, even a rudimentary one, serves as a vital roadmap for the subsequent stages.

Material Selection

The choice of wood significantly impacts the final product's appearance and durability. Hardwoods such as oak, maple, or walnut offer superior strength and a rich grain, ideal for signs subjected to frequent handling or exposure to the elements. Softwoods like pine or fir are more readily available and easier to work with, making them suitable for indoor signs with less rigorous demands. Consider the wood's color, grain pattern, and overall texture. The grain can be oriented to enhance the design's visual impact. For instance, vertical grain can emphasize height, whereas horizontal grain can provide a sense of width.

Dimensional Planning and Material Acquisition

Once your design is finalized, determine the precise dimensions of your sign. Account for all elements, including text, images, and any decorative borders. Calculate the required wood dimensions, adding extra material for cutting, sanding, and potential errors. Purchase your chosen wood, ensuring it is appropriately dried and free from significant knots or imperfections. If incorporating intricate designs or detailed lettering, consider using a thinner piece of wood for easier carving or routing.

Phase 2: Fabrication

Cutting the Wood

Precise cutting is paramount. For straight cuts, a table saw offers the greatest accuracy and control. For more intricate shapes, a jigsaw or band saw may be necessary. Ensure the wood is securely clamped to prevent movement during cutting. Always utilize appropriate safety equipment, including eye protection and hearing protection. After cutting, carefully deburr the edges with a sanding block or hand plane to ensure a smooth surface.

Transferring the Design

Transfer your finalized design onto the wood using a suitable method. For simple designs, freehand drawing with a pencil may suffice. For more complex designs, consider using tracing paper and carbon paper, or a projector to precisely project the image onto the wood's surface. Ensure the transfer is clear and accurate before proceeding to the next stage. Lightly sanding the wood surface prior to transfer can improve the adherence of the pencil or carbon paper.

Carving, Routing, or Engraving

The chosen technique for creating the design depends on its complexity and the tools at your disposal. Hand carving requires skill and patience but offers a unique and personal touch. Routing, using a router with various bits, is faster and allows for greater precision, ideal for intricate designs. Engraving, using specialized tools, creates recessed designs that add depth and visual interest. Regardless of the technique, work slowly and methodically, paying close attention to detail. Multiple passes with progressively finer tools will yield superior results.

Phase 3: Finishing

Sanding and Smoothing

Thorough sanding is essential for achieving a smooth, even surface. Begin with coarser grit sandpaper (e.g., 80-grit) to remove any significant imperfections, gradually progressing to finer grits (e.g., 120-grit, 220-grit, and finally 320-grit or higher) for a progressively smoother finish. Sand with the grain of the wood to avoid scratching. Pay close attention to edges and corners to ensure they are uniformly smooth.

Applying Finish

The choice of finish significantly impacts the sign's durability, appearance, and protection. Oil-based finishes, such as polyurethane or varnish, offer excellent durability and water resistance. Water-based finishes are less toxic and provide a more natural look. Apply the finish in thin, even coats, allowing ample drying time between coats. Multiple coats are usually required for optimal protection and depth of color. Consider using a brush, roller, or spray gun, depending on the desired finish and the complexity of the design. Each coat should be allowed to dry completely before applying the next, as per the manufacturer's instructions.

Adding Hardware

If the sign requires hanging hardware, carefully attach the appropriate fixtures. Ensure the hardware is securely fastened and capable of supporting the sign's weight. Use screws or nails of appropriate size and strength. Pre-drill pilot holes to prevent wood splitting. Consider the weight of the sign and choose hardware accordingly. For larger or heavier signs, you may need more robust hanging mechanisms.

Phase 4: Quality Control and Final Touches

Inspection and Refinement

Before declaring the project complete, conduct a thorough inspection for any imperfections or areas requiring further attention. Examine the surface for any blemishes, scratches, or uneven areas that may need additional sanding or finishing. Check the alignment of text and images, ensuring everything is positioned correctly. This stage provides a final opportunity to refine the craftsmanship and ensure the highest quality.

Protective Coating (Optional)

Consider applying a protective layer, such as a clear coat sealant or a UV-resistant finish, especially for outdoor signs exposed to harsh weather conditions. This extra layer helps to protect the sign's surface from the elements and prolongs its lifespan, preserving the quality of the craftsmanship and design.

By diligently following these steps and paying close attention to detail throughout the process, you can successfully craft a truly bespoke wooden wall sign, a piece that reflects both your creativity and your dedication to quality craftsmanship. Remember to always prioritize safety, using appropriate safety equipment throughout the entire process.

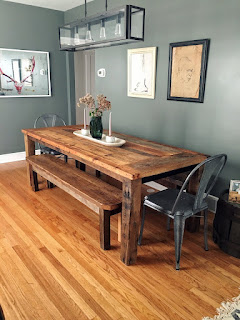
How to Construct a Dining Table with Reclaimed Wood

Crafting a Rustic Masterpiece: Building a Dining Table from Reclaimed Wood

The aroma of aged wood, the whisper of stories embedded within its grain â€" reclaiming wood offers a unique opportunity to create furniture imbued with character. This guide walks you through the process of building a stunning dining table using reclaimed lumber, transforming salvaged pieces into a centerpiece for your home.

Gathering Your Reclaimed Wood

The heart of this project lies in sourcing your materials. Finding the right reclaimed wood requires patience and a keen eye. Consider visiting salvage yards, demolition sites (with proper permissions), or even contacting local demolition contractors. Look for wood planks with interesting textures, knots, and color variations. Aim for planks of consistent thickness (ideally 1.5-2 inches thick for a sturdy table) and length, but remember, imperfections add to the rustic charm. Assess the wood for any significant rot or insect infestation before purchasing; sound structural integrity is paramount.

Choosing the Right Wood

While many types of reclaimed wood work beautifully, some are more suitable than others for a dining table. Hardwoods like oak, pine, and chestnut offer excellent durability and stand up well to daily use. Consider the overall aesthetic you're aiming for. Darker woods create a more formal feel, while lighter woods offer a brighter, more airy ambiance. Remember to purchase enough wood to account for potential waste during milling and construction.

Preparing the Reclaimed Lumber

Once you’ve acquired your wood, thorough preparation is key. This stage involves cleaning, milling, and leveling your planks to ensure a smooth, stable tabletop. Begin by brushing away loose debris and dirt with a wire brush. Inspect each plank carefully, addressing any cracks or splits with wood glue and clamps to secure them. A planer is invaluable here; it will ensure consistent thickness and a smooth surface. If you lack access to a planer, consider having a lumberyard mill the planks for you. After planing, carefully sand the planks to a fine finish, progressing through different grit sandpapers for a flawless surface.

Creating the Tabletop

The tabletop is the focal point of your dining table. You have several options for assembling it. You can create a single, wide plank tabletop from multiple smaller planks, carefully joining them edge-to-edge using wood glue and biscuits (small, oval-shaped wooden joinery pieces) for strength and alignment. Alternatively, consider creating a more rustic look by leaving small gaps between the planks, filling these gaps with epoxy resin for visual interest and structural integrity. After the glue has cured, clamp the planks firmly together and let them sit for at least 24 hours.

Constructing the Table Base

The table base provides both support and aesthetic appeal. A simple, sturdy design is ideal for a reclaimed wood table. Popular choices include a four-legged base, a trestle base, or even a pedestal base. You can construct the legs from square or rectangular reclaimed wood, ensuring that they are adequately sized and strong enough to support the weight of the tabletop. Use robust joinery techniques â€" mortise and tenon joints are excellent for durability. Consider using metal brackets or connectors for additional strength and stability, particularly for larger tables.

Finishing Touches

Once the base is complete, attach it securely to the tabletop using screws and wood glue. After the glue dries, sand any rough edges and apply a protective finish to your dining table. Consider using a clear sealant to preserve the natural beauty of the wood while protecting it from spills and wear. Alternatively, you can apply a stain to enhance the color and grain of the wood. Remember to follow the manufacturer's instructions carefully for both the sealant and stain.

Building a dining table from reclaimed wood is a rewarding project that results in a unique and beautiful piece of furniture. By following these steps and incorporating your creativity, you can craft a truly special heirloom for your home, one that tells a story of sustainability and craftsmanship.

Unique Wooden Coaster Designs for Weddings or Events

Uncork the Fun: Unique Wooden Coaster Designs for Weddings & Events

Hey there! So you're planning a wedding, a corporate shindig, or maybe just a really awesome party, and you're looking for something a little… *different* as a favor or a decorative touch? Forget the usual plastic trinkets â€" let's talk about wooden coasters! They're practical, personalized, and seriously stylish. We're diving deep into unique designs that'll make your event memorable, one perfectly chilled drink at a time.

Beyond the Basic: Exploring Wooden Coaster Styles

Let's face it, plain wooden coasters are, well, plain. But with a little creativity, they can become absolute showstoppers. Think beyond the square â€" we’re talking about shapes, engravings, and finishes that’ll blow your guests away.

Shapes That Pop

Forget boring squares and circles! Let's get creative. Imagine:

  • State/Country Outlines: Perfect for destination weddings or events celebrating a specific location. Imagine a miniature replica of Italy for a romantic Italian-themed wedding!
  • Custom Shapes: Got a logo? A favorite animal? A heart? Wooden coasters can be laser-cut into practically any shape you can dream up! Get creative!
  • Geometric Wonders: Hexagons, pentagons, even intricate tessellations â€" geometric designs add a modern and sophisticated touch. They’re surprisingly versatile and can fit almost any theme.
  • Floral Fancies: Delicate flower shapes, intricate leaf patterns â€" perfect for a rustic chic or bohemian wedding. Think about incorporating the bride's favorite flower.

Engravings that Tell a Story

Engravings take wooden coasters from simple to spectacular. Here are some ideas to get those creative juices flowing:

  • Monograms & Initials: A classic choice, elegant and timeless, perfect for weddings. You can add the couple's names and wedding date for a personal touch.
  • Personalized Messages: "Thank you for celebrating with us," "Est. [Year]," or a sweet inside joke â€" the possibilities are endless.
  • Event-Specific Designs: Corporate logos, event dates, or even a fun little illustration related to the party theme. A wine-tasting event could feature grapevines, for instance.
  • Quotations & Poems: Add a sentimental touch with a favorite quote or a short, meaningful poem. This adds a unique personal touch.

Finishes That Wow

The finish of the coaster is just as important as the design itself. Consider these options:

  • Natural Wood Finish: Shows off the beautiful grain of the wood â€" perfect for rustic or bohemian themes. This is the most straightforward approach.
  • Stained Wood: Adds a pop of color and enhances the wood grain. A dark stain can create a sophisticated look; a lighter stain can be more playful.
  • Painted Coasters: Allows for vibrant colors and intricate designs. You can add a subtle background color or a full-on piece of art.
  • Epoxy Resin Coasters: Adds a sleek, modern touch. You can embed dried flowers, glitter, or even small objects for a truly unique look. Resin can have many colors and effects.

Choosing the Perfect Wood

The type of wood you choose dramatically affects the look and feel of your coasters. Some popular choices include:

  • Bamboo: Sustainable, affordable, and comes in a variety of colors and patterns. It is a very versatile choice.
  • Maple: A classic hardwood known for its light color and fine grain. It offers a clean, elegant look.
  • Walnut: A rich, dark wood that adds a touch of luxury and sophistication. It gives a strong visual impression.
  • Oak: Durable and beautiful, oak is perfect for a rustic or traditional feel. It's a classic, time-tested option.

Beyond the Coaster: Creative Packaging & Presentation

The presentation of your wooden coasters is just as important as the coasters themselves. Don't just throw them in a box! Consider these options:

  • Custom Boxes: Add a personal touch with custom-printed boxes featuring your event's logo or a special message.
  • Gift Bags: Simple yet elegant, gift bags allow for easy transport and presentation.
  • Tissue Paper & Ribbon: A simple touch, but it adds a nice element of refinement.
  • Personalized Tags: Include a small tag with the couple's names or a thank-you message.

Making it Memorable: Incorporating Your Theme

The key to truly unique coasters is aligning them with your event's theme. Here are some ideas to get you started:

  • Rustic Wedding: Natural wood finish, floral engravings, and burlap packaging.
  • Beach Wedding: Light-colored wood, seashell or starfish engravings, and ocean-themed packaging.
  • Modern Wedding: Geometric shapes, minimalist engravings, and sleek packaging.
  • Corporate Event: Company logo engraving, professional packaging, and a high-quality wood finish.

Frequently Asked Questions

Here are some questions we often get about custom wooden coasters:

  • Q: How long does it take to produce custom wooden coasters? A: Production time varies depending on the quantity, design complexity, and the company you choose. It typically ranges from a few weeks to a couple of months.
  • Q: What's the price range for custom wooden coasters? A: The cost depends on factors like the type of wood, the design complexity, quantity, and finishing. Prices can range from a few dollars to several dollars per coaster.
  • Q: How do I care for wooden coasters? A: Generally, simply wiping them down with a damp cloth is sufficient. Avoid harsh chemicals and prolonged exposure to water.
  • Q: Can I provide my own design? A: Absolutely! Many companies allow you to upload your own designs or work with you to create a custom design.
  • Q: What is the minimum order quantity? A: Minimum order quantities vary by supplier. Some offer smaller orders for specific designs while others may require a larger quantity.

So there you have it! Hopefully, this has given you a ton of inspiration for creating truly unique and memorable wooden coasters for your next event. Remember, the key is to personalize them to reflect your style and the spirit of your celebration. Happy planning!

Thursday, January 16, 2025

Wooden Box DIY Ideas for Organizing Tools and Hardware

Unlock Your Inner Craftsperson: DIY Wooden Tool & Hardware Boxes

Tired of rummaging through chaotic tool chests and overflowing hardware drawers? Transform your organizational woes into a satisfying DIY project with a custom-built wooden box! This isn't just about storing things; it's about creating a beautiful, functional piece that reflects your personal style and enhances your workspace. From rustic farmhouse charm to sleek modern minimalism, the possibilities are as limitless as your imagination. This guide will walk you through the process, providing inspiration and practical tips to craft the perfect tool or hardware organizer for your needs.

Choosing Your Wood and Design

The journey to your perfect wooden box begins with material selection. Consider the wood's aesthetic and durability. Pine offers a readily available, affordable option with a light, workable grain. For a more robust and water-resistant box, oak or maple provide superior strength and a rich look. Think about the overall style you envision. A rustic box might utilize reclaimed wood with visible knots and imperfections, while a modern design might prefer smooth, cleanly finished hardwood. Sketch out your dimensions, considering the tools or hardware you’ll be storing. Will it be a compact box for small parts or a larger chest for power tools? Decide on the type of lidâ€"hinged, removable, or even a sliding topâ€"and visualize the interior organization. Will you add dividers? Drawers? Planning ahead ensures a smooth build.

Essential Tools and Materials

Before you dive in, gather your essential tools and materials. This list covers a basic setup; you might need additional items depending on your design’s complexity. Always prioritize safety by wearing appropriate eye protection and using tools correctly.

Essential Tools:

  • Measuring tape
  • Pencil
  • Circular saw or hand saw
  • Drill with various drill bits
  • Screwdriver (Phillips and flathead)
  • Clamps
  • Sandpaper (various grits)
  • Wood glue
  • Safety Glasses

Essential Materials:

  • Selected wood (consider thickness and dimensions)
  • Wood screws
  • Wood finish (stain, paint, varnish, etc.)
  • Optional: Hinges, drawer slides, dividers

Building Your Wooden Box: A Step-by-Step Guide

Now for the exciting part! Begin by cutting your wood pieces to the precise dimensions you've planned. Accurate measurements are crucial for a well-fitting box. Use clamps to securely hold the pieces together while you apply wood glue and screws. Ensure all joints are tight and aligned. After assembling the box, thoroughly sand all surfaces to achieve a smooth finish. This step significantly enhances the final look and feel. Apply your chosen wood finishâ€"whether it's a protective varnish, a rich stain, or a vibrant paintâ€"following the manufacturer's instructions. Let it dry completely before adding any hinges or internal dividers. Once finished, admire your handiworkâ€"a testament to your creativity and organizational prowess.

Adding Personal Touches

Don't stop at the basics! Personalize your wooden box to make it truly unique. Incorporate custom labels for different tool compartments. Burn your initials or a design into the wood for a rustic touch. Add a metal clasp for a secure closure. The possibilities are endless. This personalized touch transforms a simple storage solution into a cherished piece reflecting your individual style and craftsmanship.

Rustic DIY Wooden Bread Box Ideas for Farmhouse Style

Rustic DIY Wooden Bread Boxes: Infuse Your Farmhouse with Charm

Embrace the cozy charm of a farmhouse kitchen with a handcrafted wooden bread box! Forget mass-produced containers; this guide walks you through creating a unique, rustic bread box that perfectly complements your home’s style. We'll explore diverse designs, from simple crates to more intricate constructions, empowering you to build a bread box that reflects your personal aesthetic and woodworking skills. Prepare to unleash your creativity and add a touch of old-world craftsmanship to your space.

Choosing Your Rustic Style

Before you grab your tools, envision your ideal bread box. Do you prefer a sleek, minimalist design, or a heavily distressed, antique-inspired piece? Consider the overall style of your kitchen. A brightly painted box might pop against a neutral backdrop, while a natural wood finish blends seamlessly into a more traditional setting. Think about the size; a smaller box suits a smaller kitchen, while a larger one provides ample space for storing multiple loaves. Let the character of your home guide your choices, ensuring your bread box becomes a cherished addition rather than a clashing element.

DIY Bread Box Projects: From Simple to Sophisticated

The Repurposed Crate Transformation

Start with the easiest option: repurposing an old wooden crate. Find a sturdy crate at a flea market, antique store, or even your own garage. Sand it down thoroughly, revealing the natural wood grain. Apply a coat of food-safe wood sealant to protect against moisture and spills. You can leave it as is for a truly rustic look, or add a charming touch by painting it with chalk paint in a farmhouse-appropriate color like cream, sage green, or muted blue. Attach simple hinges to a repurposed piece of wood to create a charming lid.

Building a Classic Box from Scratch

For a more involved project, construct a bread box from scratch. This requires basic woodworking skills. You'll need to cut and assemble the sides, bottom, and top. Select wood like pine or cedar for its durability and natural beauty. Plan your dimensions carefully, keeping in mind the size of your loaves and the available counter space. Use wood glue and screws for strong joints, then sand everything smooth. Consider adding decorative elements like carved details or metal corner protectors for a more polished appearance. Don't forget the hinges and a latch for a secure closure!

Adding Farmhouse Flair: Design Details

Personalize your bread box! Several techniques elevate a simple wooden box into a true farmhouse statement piece. Consider these options:

  • Distressing the wood: Create a timeworn look by lightly sanding edges or using a distressing technique to add character.
  • Adding hardware: Antique-style hinges, latches, or handles add rustic charm.
  • Painting or staining: Explore a wide array of colors and finishes, from bright whites to deep browns.
  • Stenciling or decoupage: Add decorative flourishes using stencils or decoupage techniques with farmhouse-themed patterns.

Remember to always use food-safe materials, especially when painting or sealing the wood. With a little creativity and effort, you’ll craft a beautiful, functional bread box that reflects your unique style and adds rustic warmth to your farmhouse kitchen. Enjoy the process and the satisfying reward of a handcrafted piece you can cherish for years to come!

Get Inspired with These Gorgeous DIY Wooden Bread Box Ideas

Get Inspired with These Gorgeous DIY Wooden Bread Box Ideas

The humble bread box, a kitchen staple for generations, has undergone a stylish renaissance. No longer relegated to the utilitarian corner, the bread box now takes center stage, showcasing craftsmanship and adding a touch of rustic charm or modern elegance, depending on the design. This resurgence is largely driven by a growing interest in DIY projects and a desire for personalized, handcrafted items that reflect individual style. This article explores the captivating world of DIY wooden bread boxes, offering a plethora of inspiration for crafting your own unique and beautiful addition to your kitchen.

Choosing Your Wood: The Foundation of Your Project

The selection of wood is paramount in determining the final aesthetic and durability of your bread box. Different wood types offer distinct characteristics in terms of grain, color, and workability. Careful consideration should be given to these factors before embarking on your project.

Popular Wood Choices for Bread Boxes

Several wood types are particularly well-suited for bread box construction due to their inherent properties. These include:

  • Cedar: Known for its natural resistance to insects and its pleasant aroma, cedar offers excellent durability and a beautiful reddish hue.
  • Pine: A readily available and relatively inexpensive softwood, pine is easy to work with, making it ideal for beginners. Its light color allows for easy staining or painting.
  • Oak: A classic hardwood choice, oak is renowned for its strength, durability, and rich grain patterns. It provides a luxurious and sophisticated look.
  • Walnut: Boasting a deep, luxurious brown color and stunning grain, walnut lends an air of elegance and refinement to any bread box.
  • Reclaimed Wood: Using reclaimed wood adds a unique character and sustainability element to your project. The varied colors and textures tell a story, contributing to the overall charm.

Considerations for Wood Selection

Beyond aesthetics, consider factors such as:

  • Budget: Hardwood options like oak and walnut are generally more expensive than softwoods like pine.
  • Skill Level: Hardwoods can be more challenging to work with than softwoods, requiring more experience and specialized tools.
  • Desired Aesthetic: The wood type significantly influences the final look and feel of your bread box. Consider whether you prefer a rustic, modern, or traditional style.

Design Inspiration: From Rustic Charm to Modern Minimalism

The beauty of a DIY bread box lies in its adaptability. Your design can reflect your personal style, ranging from rustic farmhouse charm to sleek modern minimalism. Exploring diverse design options is crucial in finding the perfect fit for your kitchen.

Rustic Farmhouse Style

Embrace the warmth and simplicity of a rustic farmhouse aesthetic. Consider using reclaimed wood with visible knots and imperfections to enhance the aged, lived-in feel. A simple, rectangular design with minimal embellishments will complement this style perfectly. A natural oil finish will further highlight the wood's character.

Modern Minimalist Style

For a contemporary kitchen, opt for clean lines and a minimalist design. Choose a smooth, light-colored wood like pine or birch. A sleek, rectangular or even square shape with hidden hinges and a simple latch will contribute to the minimalist aesthetic. A clear or lightly tinted varnish will showcase the wood's natural beauty.

Shaker Style Bread Box

The Shaker style, known for its simple elegance and functionality, translates beautifully into a bread box design. This style typically features clean lines, simple joinery, and often, a slightly tapered shape. Choose a light-colored wood like maple or cherry to achieve an authentic Shaker look. A natural finish or a subtle stain will highlight the wood grain.

Construction Techniques: Tools and Processes

The construction process will depend on your chosen design and skill level. However, some common techniques and tools are used across various bread box designs.

Essential Tools

Gathering the necessary tools beforehand ensures a smooth and efficient building process. You will likely need:

  • Measuring Tape and Pencil: Accurate measurements are crucial for precise cuts and a well-fitting bread box.
  • Saw (Hand Saw, Circular Saw, or Miter Saw): The type of saw depends on your skill level and the complexity of the cuts.
  • Drill and Drill Bits: For creating pilot holes for screws and hinges.
  • Screwdriver (Phillips and Flathead): To secure the various components of the bread box.
  • Sandpaper (Various Grits): For smoothing surfaces and edges.
  • Clamps: To hold pieces together while the glue dries.
  • Wood Glue: For strong and durable joints.
  • Finishing Supplies (Stain, Varnish, or Oil): To protect and enhance the wood's appearance.
  • Hinges and Latch: To secure the lid and create a functional bread box.

Common Construction Methods

Several methods can be employed to construct the bread box, depending on the design's complexity. These include:

  • Rabbet Joints: Creating a groove in one piece of wood to receive the edge of another piece, resulting in a strong and visually appealing joint.
  • Dado Joints: Similar to rabbet joints, but the groove is cut across the width of the wood.
  • Butt Joints: The simplest joint, where two pieces of wood are simply glued and screwed together. Reinforcement is often necessary.

Finishing Touches: Adding Personalization and Protection

Once the bread box is assembled, it's time to add the finishing touches. This stage allows for personalization and provides essential protection for the wood.

Finishing Options

Several options exist to protect and enhance your bread box's appearance:

  • Natural Oil Finish: This enhances the wood's natural beauty and provides some protection.
  • Varnish: Offers a more durable and water-resistant finish.
  • Stain: Allows you to alter the wood's color to match your kitchen's aesthetic.

Personalization Ideas

Personalize your bread box to reflect your unique style:

  • Engraving: Add a monogram or a simple design.
  • Painting: Introduce pops of color or create a decorative pattern.
  • Hardware Upgrades: Choose unique hinges and latches to add a touch of elegance.

Creating a DIY wooden bread box is a rewarding project that combines creativity, craftsmanship, and functionality. By carefully selecting your wood, considering different design styles, and utilizing appropriate construction techniques, you can craft a truly unique and beautiful piece for your kitchen, a testament to your skill and personal style.

Wooden Bread Box DIY Ideas for DIYers on a Budget

Economical Wooden Bread Box DIY Projects: A Guide for Budget-Conscious Crafters

The allure of a handcrafted wooden bread box, offering both practicality and rustic charm, is undeniable. However, the cost of commercially available bread boxes can often be prohibitive. This comprehensive guide offers a range of DIY projects designed to help budget-conscious individuals create their own stunning and functional bread boxes without breaking the bank. We will explore various techniques, materials, and design considerations, ensuring accessibility for all skill levels.

Sourcing Affordable Materials: The Foundation of Budget-Friendly DIY

The key to a successful budget DIY project lies in strategic material sourcing. Avoid purchasing pre-cut lumber from big-box stores, which can significantly inflate costs. Instead, consider the following avenues:

Repurposing and Recycling Existing Wood

One of the most cost-effective approaches involves repurposing existing wood. This could include reclaimed wood from old pallets, discarded furniture, or even salvaged construction materials. Thorough cleaning and sanding are crucial steps to prepare the wood for your project. Remember to check for any embedded nails or screws before commencing work.

Caution: Always ensure the wood is clean, dry, and free from rot or insect infestation before use. Treat reclaimed wood with appropriate wood preservatives if necessary.

Utilizing Scrap Wood from Local Suppliers

Many lumber yards and woodworking shops are willing to sell offcuts or scrap wood at significantly reduced prices. Contact your local suppliers and inquire about their scrap wood availability. This is an excellent way to acquire smaller pieces of wood suitable for bread box construction, minimizing waste and cost.

Seeking Affordable Lumber from Budget-Friendly Retailers

While big-box stores might offer convenience, smaller, independent lumber yards often provide more competitive pricing, particularly for smaller quantities of wood. Shop around and compare prices before making a purchase. Consider less expensive wood species, such as pine or fir, for your project. These woods are readily available and often more affordable than hardwoods.

Simple Bread Box Designs for Beginners

For those new to woodworking, starting with a simple design is highly recommended. These designs minimize complexity while maximizing functionality and aesthetic appeal.

The Classic Box Design

This straightforward design involves creating a simple rectangular box with a hinged lid. The box can be constructed using basic woodworking joints such as butt joints, reinforced with wood glue and screws. For a more rustic look, consider leaving the natural wood grain visible, applying a clear sealant to protect the finish. Adding simple decorative elements such as metal hinges or wooden latches can enhance the overall aesthetic appeal without significantly increasing costs.

The Crate-Style Bread Box

A crate-style bread box offers a charming, rustic appearance. This design utilizes relatively few pieces of wood, making it ideal for beginners and those working with limited resources. The crate design can be easily adapted to fit different sizes and styles. Consider adding decorative elements such as stenciling or painting to personalize the bread box further.

The Simple Lidded Box with Cutouts

This design is a slight variation on the classic box, adding visual interest through carefully planned cutouts on the lid or sides. These cutouts can be simple geometric shapes or more elaborate designs, depending on your skill level and desired aesthetic. Remember to carefully plan the placement and size of cutouts to ensure structural integrity.

Advanced Bread Box Designs for Experienced DIYers

For those with more experience in woodworking, more complex designs offer greater creative freedom and the chance to incorporate more advanced joinery techniques.

The Dovetailed Bread Box

Dovetail joints are a hallmark of fine woodworking, offering both strength and visual appeal. While requiring a higher level of skill, the resulting bread box possesses superior durability and a professional finish. Precise measurements and careful execution are crucial for successful dovetail joinery.

The Mortise and Tenon Bread Box

Similar to dovetail joints, mortise and tenon joints provide exceptional strength and stability. This technique involves creating precisely sized holes (mortises) and corresponding pegs (tenons) to connect the various components of the bread box. Proper planning and execution are essential to ensure a tight and secure fit.

Finishing Touches and Budget-Friendly Enhancements

Even the simplest bread box can be elevated with thoughtful finishing touches. These enhancements add personality and functionality without breaking the budget.

  • Natural Oil Finish: Applying a natural oil finish, such as linseed oil or tung oil, protects the wood while enhancing its natural beauty. These oils are relatively inexpensive and easy to apply.
  • Wax Finish: A beeswax finish provides a protective layer and a subtle sheen, further enhancing the natural look of the wood.
  • Simple Hardware: Use readily available, inexpensive hardware such as simple hinges, latches, or handles. Avoid overly ornate or expensive hardware to stay within budget.
  • Personalized Touches: Add a personal touch by stenciling, painting, or engraving designs onto the bread box. These details can significantly elevate the overall aesthetic appeal.
  • By carefully considering material sourcing, choosing an appropriate design, and incorporating budget-friendly finishing techniques, even the most novice DIY enthusiast can create a beautiful and functional wooden bread box without exceeding their budget. Remember, the process of creating something with your own hands is as rewarding as the final product itself.